
In my last article I wrote about installing Nextcloud on a DiskStation. After that, you should do some improvements, to ensure that Nextcloud is operating perfectly and to increase security. Also, there could be some error messages, depending on the runtime environment. This article explains the most common and important settings.
Hint: This tutorial works also with Owncloud 8 and Owncloud 9 as Nextcloud 9 is a fork of Owncloud 9.
Preperation
Nextcloud has to be installed and executed on your DiskStation.
Optimization and error handling
First, enter the Nextcloud web interface and switch to the admin panel. In the admin panel, Nextcloud executes some basic tests and reports errors and optimization hints.
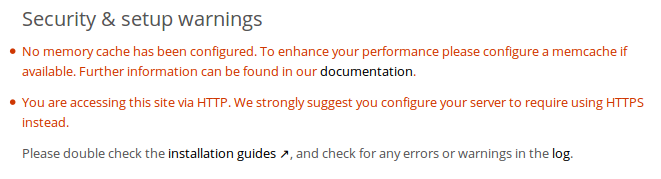
The shown security warnings depend on how Nextcloud got installed and which settings on the web server were already done. I’M going to explain the most common ones and how to get rid of them. Another small hint, this warnings don’t mean that Nextcloud isn’t working, they are just notifications about security holes and possible improvements.
Hint: Always use putty or WinSCP to change config files or permissions. One reason is, that the DSM text editor always enters the root user as owner whenever you change or create a file. Another reason is, that not all users and groups are available withing the DSM permission settings.
Data folder
You shouldn’t see this message, if you have used this article or the official Nextcloud documentation. If you haven’t used a custom folder for your data, Nextcloud uses the default data folder within the \web directory of your DiskStation. In this case, the message “Your data directory and your files are probably accessible from the internet.” is shown. You can restrict the access to the data folder, but it is way more secure to move the data folder out of the web root.
HSTS
This is the most common message since DSM 6: “The “Strict-Transport-Security” HTTP header is not configured to least “15768000” seconds. For enhanced security we recommend enabling HSTS as described in our security tips.”
It’s a bit tricky to solve this issue. Since DSM 6, ngingx is used as default web server. If you don’t have experience with nginx, it takes a while till you find the correct place to enable HSTS. In DSM 5 there was on option that could have been enabled. A big “Thank you” goes to FalkenaugeMihawk and the German Synology forum for this solution.
- Connect to your DiskStation over ssh and log in as admin.
- Get root access by entering sudo su – and password.
- Create a new file in /etc/nginx/conf.d and name it “http.*.conf” (the star should be replaced with something that sounds logical). Open the file (e.g. command vi /etc/nginx/conf.d/http.hsts.conf).
- Add this line: add_header Strict-Transport-Security “max-age=15768000; includeSubDomains; preload;”;
- Save and close the file.
- Reload nginx config: nginx -s reload

Alternatively you could create an virtual host and enable HSTS there.
Memcache
Also the following hint is very common.

To get rid of this message, you have to enable one of the 4 possible mem cache option. Luckily the DiskStation offers 2 of them: APC und APCu. To enable mem caching, log into your DSM. Open the web server via the menu and go to PHP settings, there you have to tick “Enable PHP cache” and save the changes.

Now you have to modify the Nextcloud config file.
- Connect to your DiskStation over ssh and log in as admin.
- Get root access by entering sudo su – and password.
- Open the Nextcloud config file using vi /volumeX/web/Nextcloud/config/config.php
- Add the following line within the brackets: ‘memcache.local’ => ‘\\OC\\Memcache\\APCu’,
- Save and close the file.

Permissions and ownership
The last step we have to do is, altering the permissions and owner of all files and folders of our Nextcloud installation. The permissions should be as strict as possible. The best solution is, to create a script(ends with .sh) on your DS. To perform an uptade you have to loosen the permissions. Using a script you could alter the permissions quickly. This is how the script should look like:
#!/bin/bash
ncpath='/volume1/web/nextcloud'
htuser='http'
htgroup='http'
rootuser='root'

printf "chmod Files and Directories\n"
find ${ncpath}/ -type f -print0 | xargs -0 chmod 0640
find ${ncpath}/ -type d -print0 | xargs -0 chmod 0750
find /volume1/ncdata/ -type f -print0 | xargs -0 chmod 0640
find /volume1/ncdata/ -type d -print0 | xargs -0 chmod 0750

printf "chown Directories\n"
chown -R ${rootuser}:${htgroup} ${ncpath}/
chown -R ${htuser}:${htgroup} ${ncpath}/apps/
chown -R ${htuser}:${htgroup} ${ncpath}/config/
chown -R ${htuser}:${htgroup} ${ncpath}/themes/
chown -R ${htuser}:${htgroup} ${ncpath}/updater/
chmod +x ${ncpath}/occ

printf "chmod/chown .htaccess\n"
if [ -f ${ncpath}/.htaccess ]
then
chmod 0644 ${ncpath}/.htaccess
chown ${htuser}:${htgroup} ${ncpath}/.htaccess
fi

chown ${htuser}:${htgroup} ${ncpath}/.user.ini
To execute the script enter sh /volumeX/Pfad/zum/Script.sh
You have done the most important settings now. Enter the admin panel again and get sure that all the messages disappeared.
Possible mistakes
If the data folder has the wrong permissions and is not readable by Nextcloud, there is a message about this in your admin panel.
If you get a blank page or an error 500 if you want to enter Nextcloud, then it is most likely that there is an error in your Nextcloud config file. Nextcloud can’t read the file if the format is broken. Get sure that all changes are added within the brackets. Also get sure that every line ends with a comma, if there is another line afterwards.
Check the permissions and owner of the Nextcloud folders and files.
Personally, I had a problem with permissions. I already applied strict permission and changed config.php (via putty). Although the permissions were still correct afterwards, Nextcloud couldn’t read the file. After undoing the changes the file was OK again. To apply the changes anyway, I used the script (from this article) to apply the loose permissions. Then I change the config file and applied the strict permissions again.
In my next article I’ll explain how to update Nextcloud.
One thought on “Your own cloud: Nextcloud optimization on a Synology DiskStation and DSM 6”